
EagerLED Academy
Sortie audio NovaStar CMS130 : Pourquoi la pièce est-elle silencieuse ?
novembre
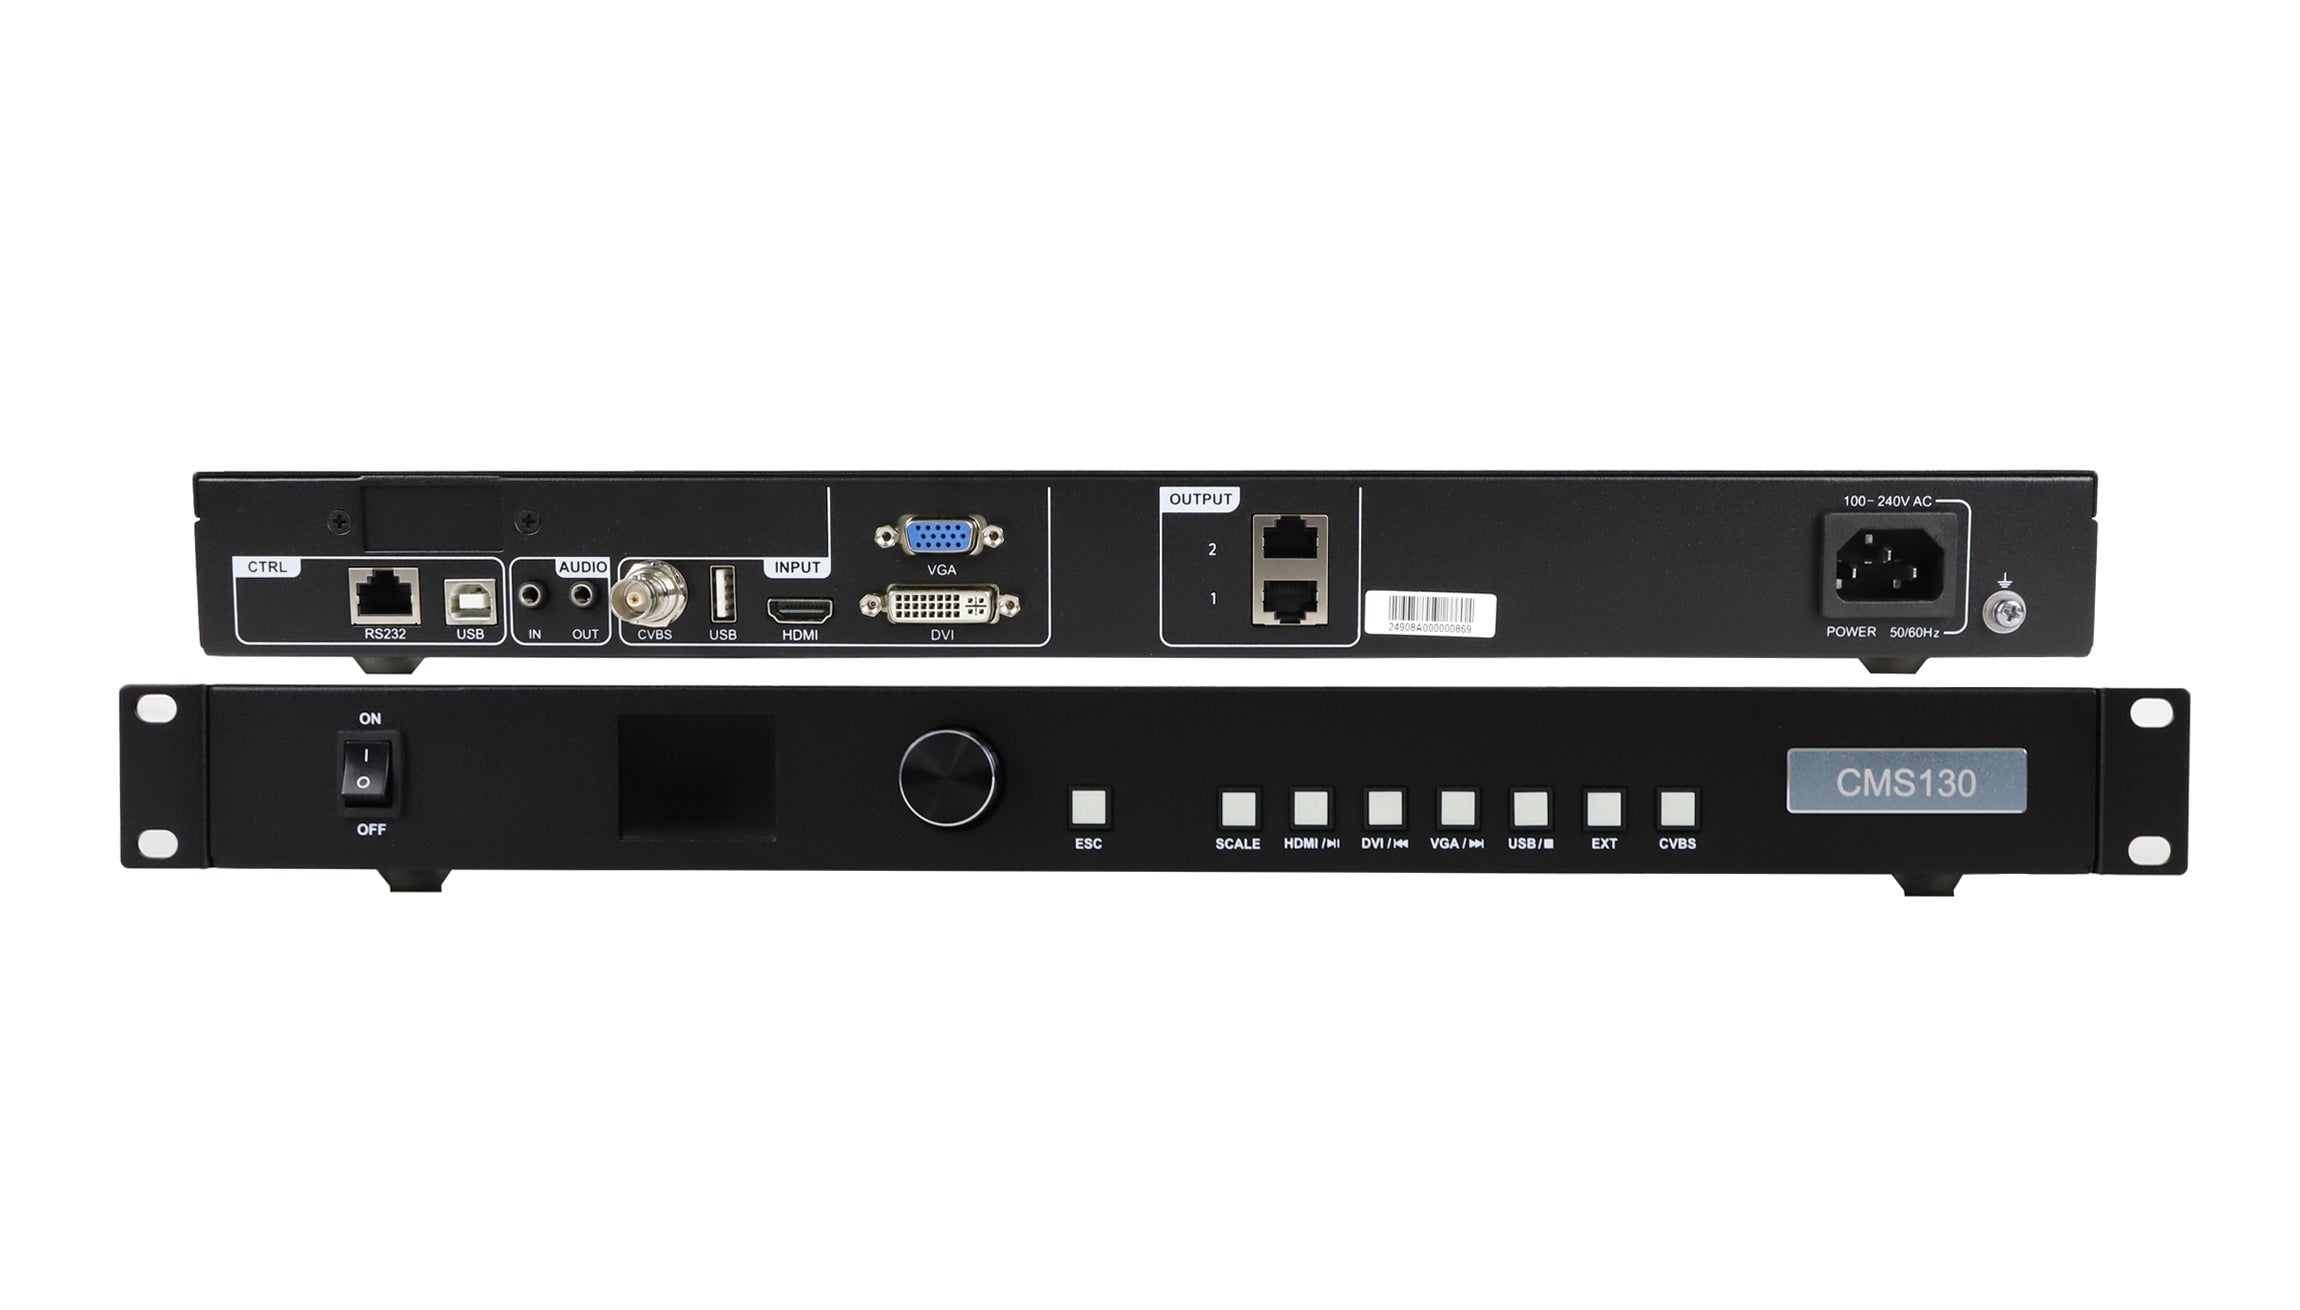
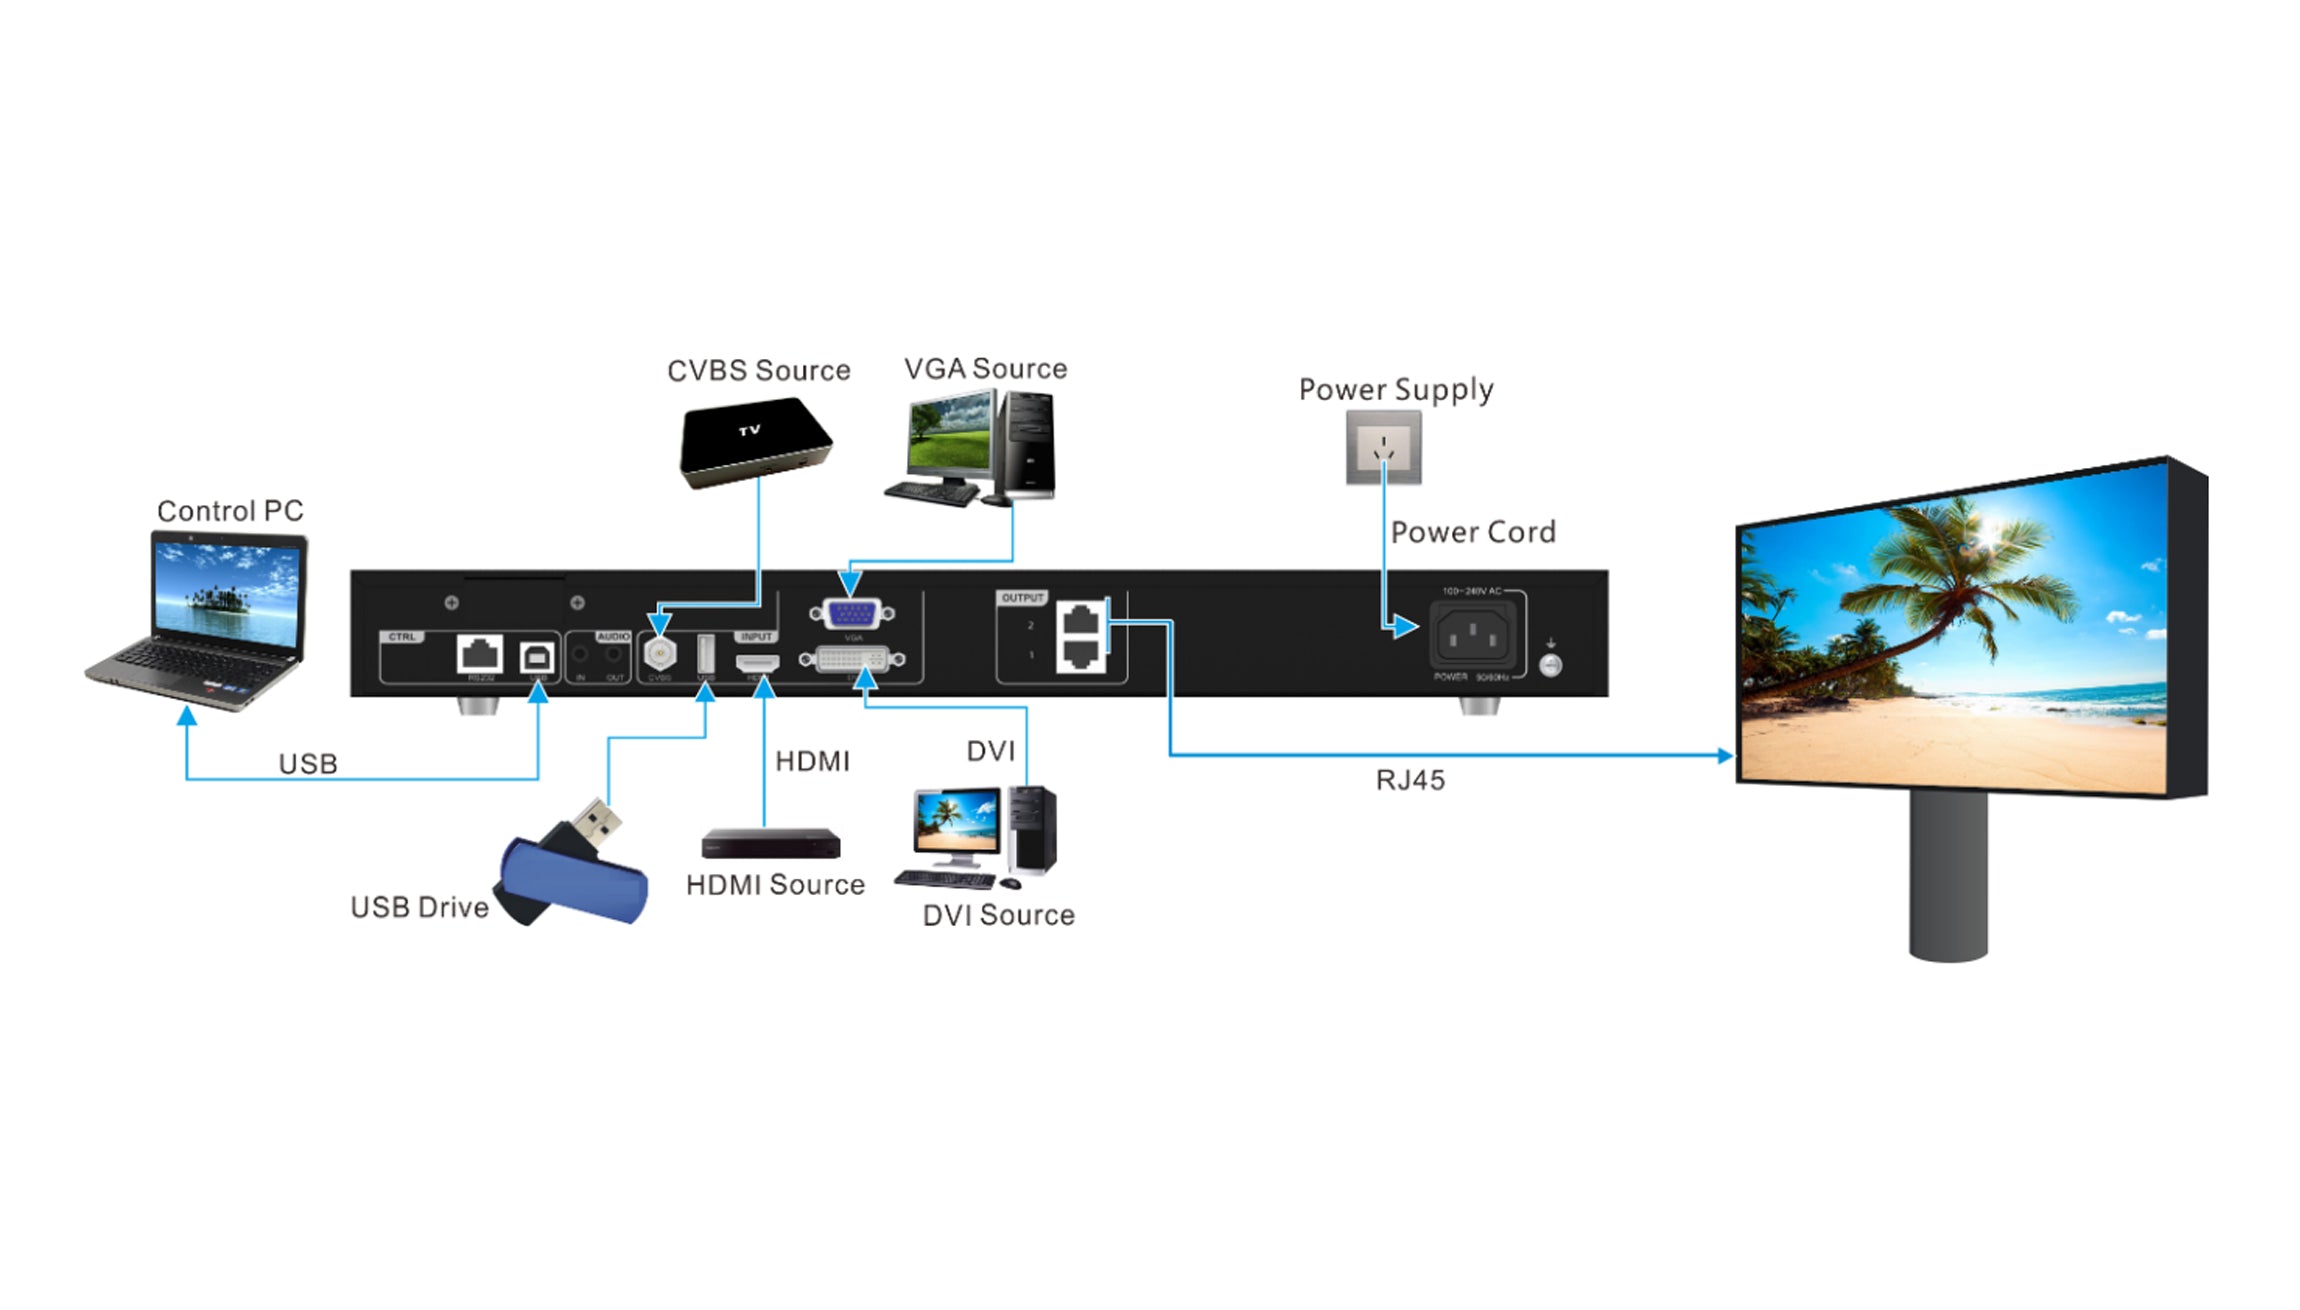
The picture is up on the LED wall, but the room is silent. If your drawing uses the NovaStar CMS130 audio output, follow that connection to the room’s audio equipment. The two LED Ethernet outputs go to the receiving cards. The CMS130 specification lists a separate audio input and output, so the sound needs its own route to the mixer, amplifier or other compatible audio system in the design.
This is a handover check for the integrator setting up a small venue with a CMS130. Start with the source the venue will use on opening day. A successful test with the installer’s laptop can miss a problem with the event laptop, the playback file or the audio input assigned to the room.
Where the NovaStar CMS130 audio output fits
The rear-panel table in the Spécifications du CMS130 describes two audio connections for input and output. The same table identifies the two Ethernet outputs as connections to the receiving cards. The distinction is easy to see on a drawing once you give each signal its own line. Label the source, the controller connection and the destination for each line.
For example, the venue might send a presentation to the CMS130 over HDMI and route audio to a mixer at the rack. The design still needs to say where the mixer’s signal comes from. If the mixer is supposed to receive the source through the controller, verify the chosen input and the controller’s audio behavior on the actual unit. If the venue routes audio directly from the source, write down that route and test it as part of the handover.
Placez l'étiquette d'entrée de la console de mixage sur le même schéma que la sortie audio du NovaStar CMS130. Une mention du type « audio vers rack » laisse l'utilisateur dans l'incertitude quant à l'entrée à vérifier. En revanche, une mention comme « sortie audio du contrôleur vers l'entrée étiquetée "mur LED" sur la console de mixage de la salle » permet une vérification aux deux extrémités. En cas de divergence entre le schéma et les étiquettes de l'équipement, comparez la page produit du CMS130 avec le panneau arrière visible.
Find the point where the sound stops
Use a short clip with a spoken count and a visible change on screen. Before checking the NovaStar CMS130 audio output, confirm that the clip has an audible track and that the source is set to send sound along the route in the drawing. On a laptop, the picture can remain on the external display even when the operating system has selected a different audio device. The source selection and the selected audio destination are both worth recording.
Ensuite, vérifiez la sortie audio. Si la console de mixage possède un vumètre d'entrée, observez si le niveau du canal concerné varie pendant le décompte. Si le vumètre bouge et que la salle est silencieuse, suivez le signal de ce canal jusqu'à la sortie de la salle. Si le vumètre reste immobile, vérifiez la source, le câble et la connexion du contrôleur avant de modifier le mixage de la salle. Conservez les réglages d'origine afin qu'une vérification sur une entrée n'affecte pas le fonctionnement d'une autre.
| Ce que vous voyez ou entendez | Prochaine vérification | Note de passation de pouvoir utile |
|---|---|---|
| Image on wall, no movement on the mixer meter | Verify the source audio selection and the connection to the named mixer input | Notez le dernier moment où le décompte était audible ou mesuré. |
| Meter moves, room stays silent | Vérifiez l'attribution des canaux, l'état du mode muet et la sortie audio de la salle. | Notez quelle sortie alimente la pièce |
| Le son disparaît après le changement de source. | Vérifiez le chemin audio réel de la nouvelle source et la séquence de commutation de l'opérateur. | Consignez la source de la défaillance et la configuration qui a permis de la rétablir. |
Effectuez la transition de la manière dont le lieu l'utilisera.
Test the NovaStar CMS130 audio output as part of the source changeover rather than as a one-off cable check. A venue that starts a show with a clip and then switches to slides should run both parts back to back. Include the same mixer channel, source device and playback file that staff will use. Ask one person to watch the wall and another to listen from the audience area. They can catch a missing channel or a noticeable picture and sound mismatch that a meter alone will miss.

Keep the handover note short enough to use from the booth. For each source, write which button the operator uses, where the audio should appear and what the room should sound like during the test clip. If the NovaStar CMS130 audio output is part of the route, put its cable label next to the destination label. If a source uses a separate house connection, include that instruction on its own line. That detail helps the operator who takes over after the installation crew leaves.
When a venue tests a recording with speech, try a few seconds of the actual introduction as well. A known clip is handy for isolating a fault. The real opening cue confirms that the source, file and room settings work together. Add a note if any source needs an adjustment so the next rehearsal starts from a known setup.
Put the rehearsal result on the cue sheet
Consider a hotel ballroom that runs its welcome video from a venue computer and takes slides from a presenter’s laptop. The video sounds fine. When the operator switches the picture to the laptop and opens a slide with a recorded interview, the audio meter drops. Before touching the master volume, the operator can check the laptop’s selected audio device and see whether the source change also called for a different mixer input. If the cue sheet names that input, the check takes one step.
Write the result in terms the operator can recognize. “Welcome clip, venue computer, meter on the LED wall channel” and “interview slide, presenter laptop, meter on the guest input” are useful notes when those are the routes confirmed at rehearsal. If the show later replaces the laptop or changes the cable adapter, repeat that one cue before guests arrive. Keep the verified connection notes with the cue sheet the operator actually uses, rather than in a separate equipment quotation.
Questions posées depuis le stand
Puis-je utiliser les ports Ethernet des LED pour alimenter le système audio de la pièce ?
La spécification indique que ces ports sont des sorties pour les cartes de réception LED. Identifiez séparément la connexion audio de la pièce et vérifiez que son entrée correspond au signal et au câble que vous prévoyez d'utiliser.
La spécification garantit-elle un son provenant de chaque source vidéo ?
The rear-panel table identifies audio input and output. It does not establish the behavior of your particular source, file and configuration. Run the sound check with the equipment and media the venue will use.
What if the venue needs a powered speaker?
Ask the audio supplier to confirm that the speaker accepts the proposed input and that its level and connector suit the selected route. Test the NovaStar CMS130 audio output through that equipment before relying on it for an event.
Share the source and room audio plan
Send the name of the playback device, the planned input and the mixer or speaker model. Mark the NovaStar CMS130 audio output and its destination if the room uses it. Demander EagerLED to review your CMS130 signal plan avant de finaliser la liste du matériel ou de réserver la séance de mise en service.